The production process for inflatable gymnastics mats involves five distinct stages: material preparation, precision cutting, heat welding, assembly, and quality control. First, high-grade Drop Stitch Fabric is inspected and cut to size using CNC machines. Next, the side rails and reinforcing strips are attached using High-Frequency Welding technology, which fuses the PVC layers without glue for maximum durability. Accessories like valves and handles are then installed manually. Finally, every mat undergoes a mandatory 24-hour inflation test to check for air leaks before being deflated, cleaned, and packed for shipment.
Table of Contents
What steps are involved in the production of inflatable mats?
Modern inflatable mat production is a hybrid of automated precision and manual craftsmanship.
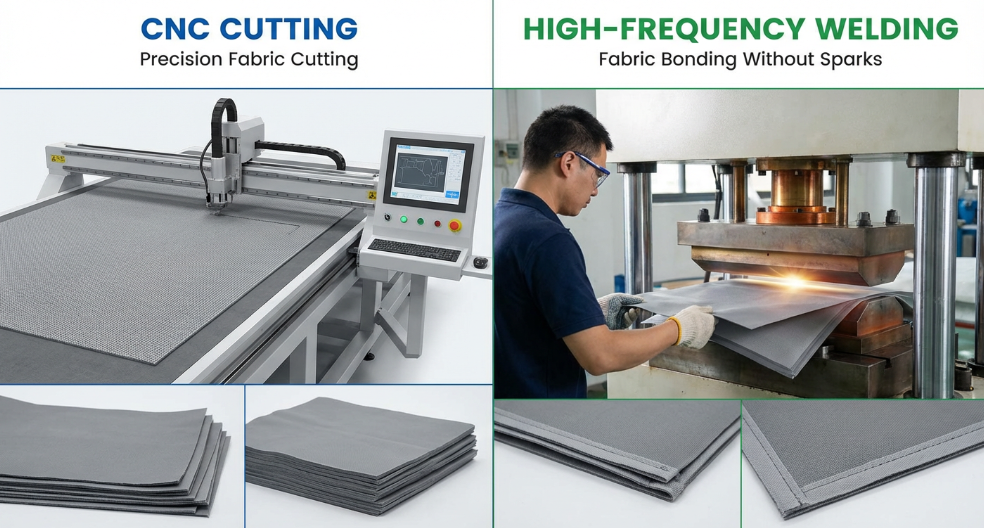
Step 1: Material Preparation & Cutting
The core material—Double Wall Fabric (DWF)—arrives in huge rolls.
- Action: Automated CNC plotting machines unroll the fabric and cut it to the exact dimensions (e.g., 3m x 1m) with millimeter precision.
- Why it matters: CNC cutting ensures the mat is perfectly rectangular, preventing the "twisted" look seen in cheap manual-cut mats.
Step 2: Rail Preparation
The side walls (rails) are cut from PVC tarpaulin.
- Action: Logos and center lines are printed onto these strips using UV printers before assembly.
Step 3: High-Frequency Welding (The Critical Step)
This is where the magic happens.
- Action: Instead of using glue, a machine uses high-frequency electromagnetic waves to melt the PVC of the rail and the DWF together.
- Result: The two pieces become one. This seam is airtight and stronger than the material itself.
Step 4: Assembly of Accessories
- Action: Workers manually attach handles, D-rings, and valves. While some factories glue these, top-tier factories use hot-air welding for these small parts too.
Step 5: The "Aging Test" (QC)
- Action: The mat is fully inflated to 10 PSI and left alone for 24–48 hours.
- Goal: To ensure there are absolutely no slow leaks.
How long does each step of the production process take?
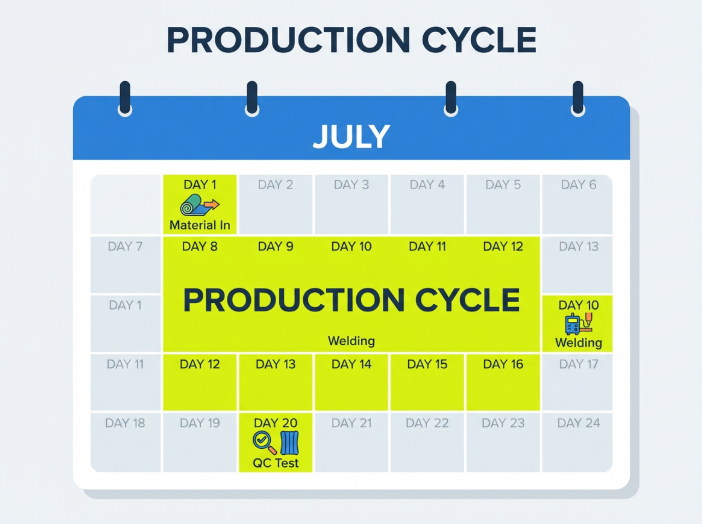
For a standard order of 50 units, the timeline typically looks like this:
| Stage |
Duration |
Notes |
| Material Sourcing |
1 – 3 Days |
If using standard Grey/Blue. Custom colors take 10+ days. |
| Cutting & Printing |
2 Days |
CNC machines are fast; UV printing takes time to cure. |
| Welding & Assembly |
5 – 7 Days |
This is the most labor-intensive phase. |
| Inflation Test (QC) |
2 – 3 Days |
Cannot be rushed. Every mat needs 24-48h. |
| Packing |
1 Day |
Cleaning, folding, and boxing. |
| Total Lead Time |
15 – 20 Days |
Add 7 days for peak season (Oct-Dec). |
Note: This does not include shipping time (30–40 days by sea).
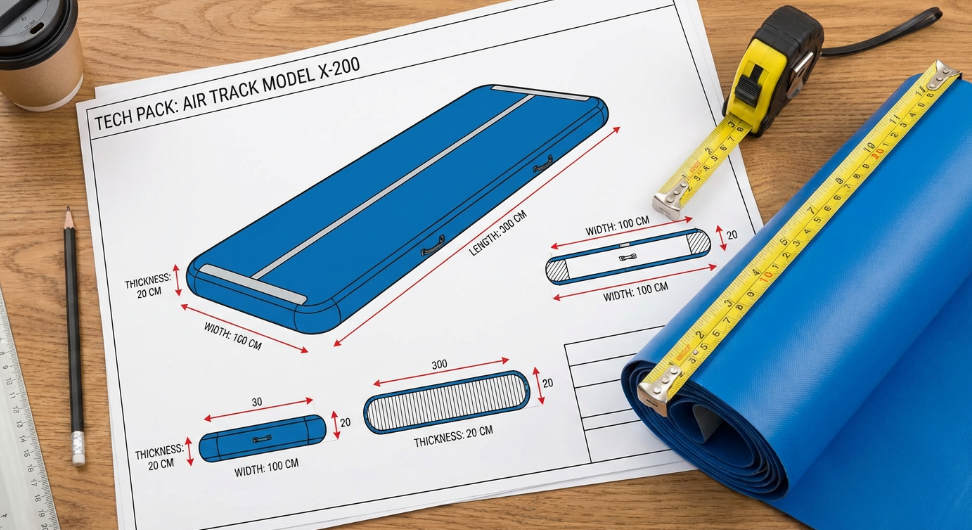
How do I ensure the mats are produced according to my specifications?
The gap between what you imagined and what is produced is bridged by clear documentation.
The "Golden Sample" Protocol
- Create a Tech Pack: A document listing exact pantone colors, handle placement measurements (e.g., "Handle center must be 50cm from edge"), and logo orientation.
- Approve a Pre-Production Sample: For large orders, have the factory make ONE unit first. Review photos/videos of it. Once approved, this becomes the "Golden Sample."
- Sign Off: The factory manager uses this Golden Sample as the reference for the mass production line.
Key Specification Checkpoints
- Thickness: Is it actually 20cm, or did they use 15cm material?
- Valve Type: Did they use the premium Bravo valve or a generic clone?
- Velcro Width: Is the connecting Velcro 10cm wide (standard) or skinnier?
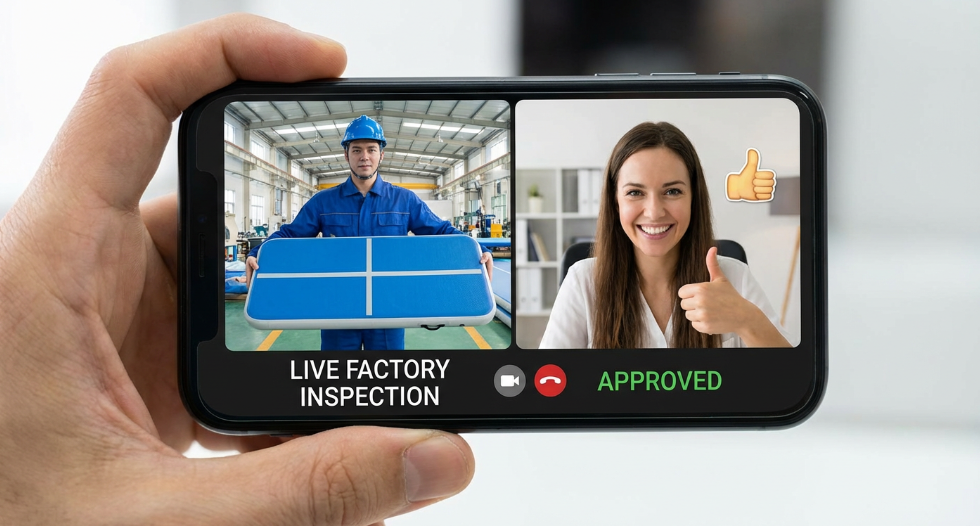
Can I inspect the production process during manufacturing?
Yes, and you should. Visibility is the best disinfectant against quality fade.
Methods of Inspection
- During Production (DUPRO):
- What: A third-party inspector visits when 20% of the goods are finished.
- Why: To catch systemic errors (e.g., wrong logo color) early, before the whole batch is ruined.
- Live Video Audit:
- What: Ask your sales rep to video call you from the production line.
- Why: To see if the factory is clean, organized, and actually working on your order (look for your specific colors on the line).
- Final Random Inspection (FRI):
- What: Inspection after 100% of goods are packed.
- Why: To verify the quantity, packaging, and final quality before the container is sealed.
Pro Tip: Even mentioning that you might send an inspector usually keeps the factory on their toes.
Conclusion
Understanding the production process empowers you to be a better buyer.
- Respect the QC Time: Never pressure a factory to skip the 24-hour inflation test to "ship faster." That is how you get leaking mats.
- Focus on Welding: Confirm the factory uses High-Frequency Welding, not just glue.
- Monitor Milestones: Ask for photo updates at the "Cutting," "Printing," and "Testing" stages.
When you treat the production process as a collaboration rather than a black box, the result is a consistent, high-quality product.
Our production line combines state-of-the-art CNC precision with rigorous 48-hour QC testing. We invite you to witness the process via video call for total peace of mind.
See How We Build Your Mats https://aftersea.net/pages/customize-air-tracks
References
-
The Production Process of Inflatables
https://qualityinspection.org/
-
Sijia Industrial – Drop Stitch Fabric Manufacturing Process
http://www.sijia.cn/


